LTD Power by Bagel

Discussion on Stirling or "hot air" engines (all types)
Jerry
Posts: 79
Joined: Sun Jul 29, 2012 10:42 pm
Location: Las Vegas

Re: LTD Power by Bagel

Post by Jerry »

Good idea about using paint, wrapping in foil proved to add too much thickness, and it worries me about thermal transfer anyway, thanks again Ian! The mixer is still in use, had to replace the UHMW stops at some point in the past couple of years, and I just found the old ones in one of the tool boxes. Lucky find while rummaging, each piece is about 3" long 3/4" tall and 5/8" thick, so there's enough for several displacer glands, and maybe for a piston attempt, and a few bearings.

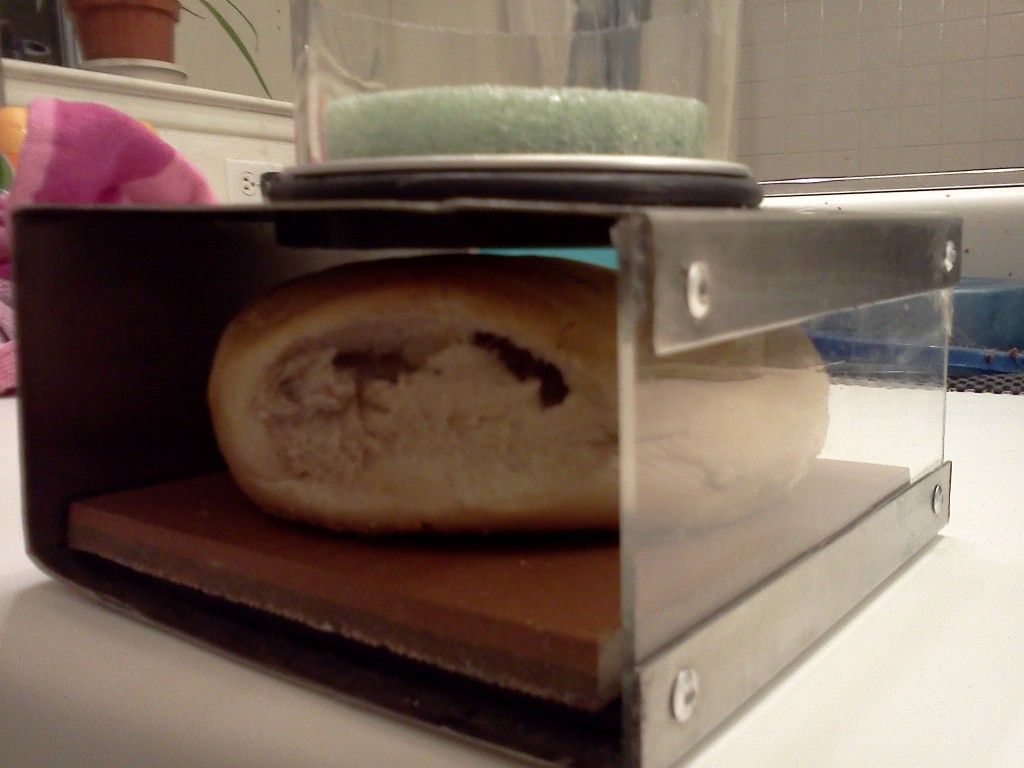
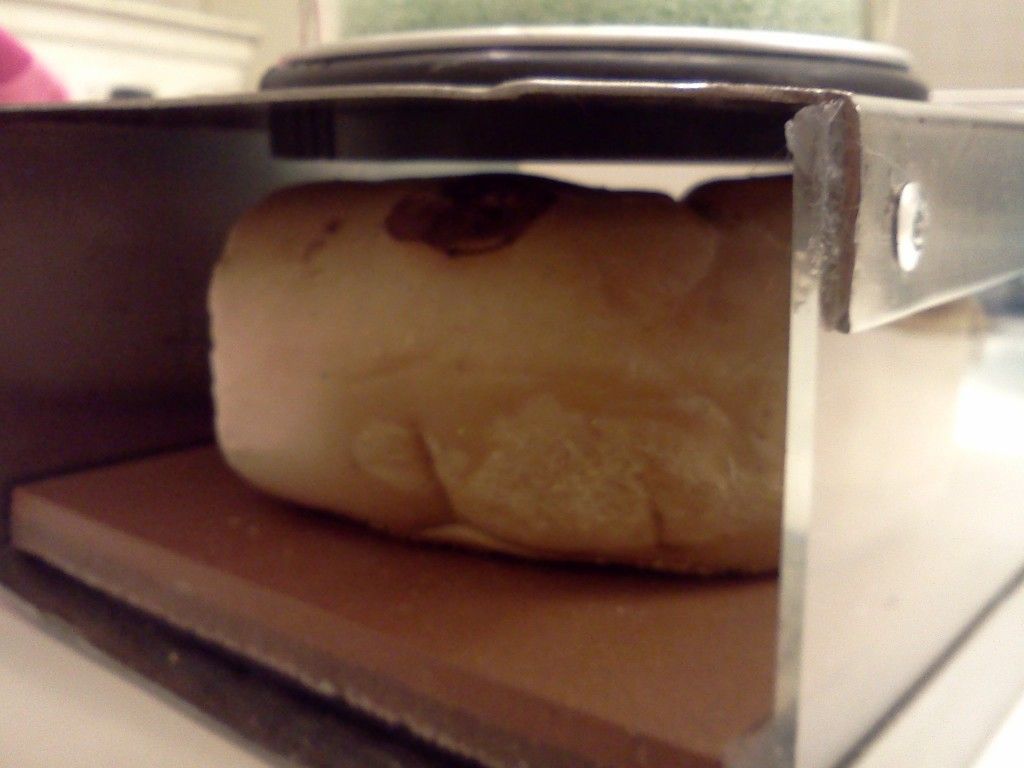
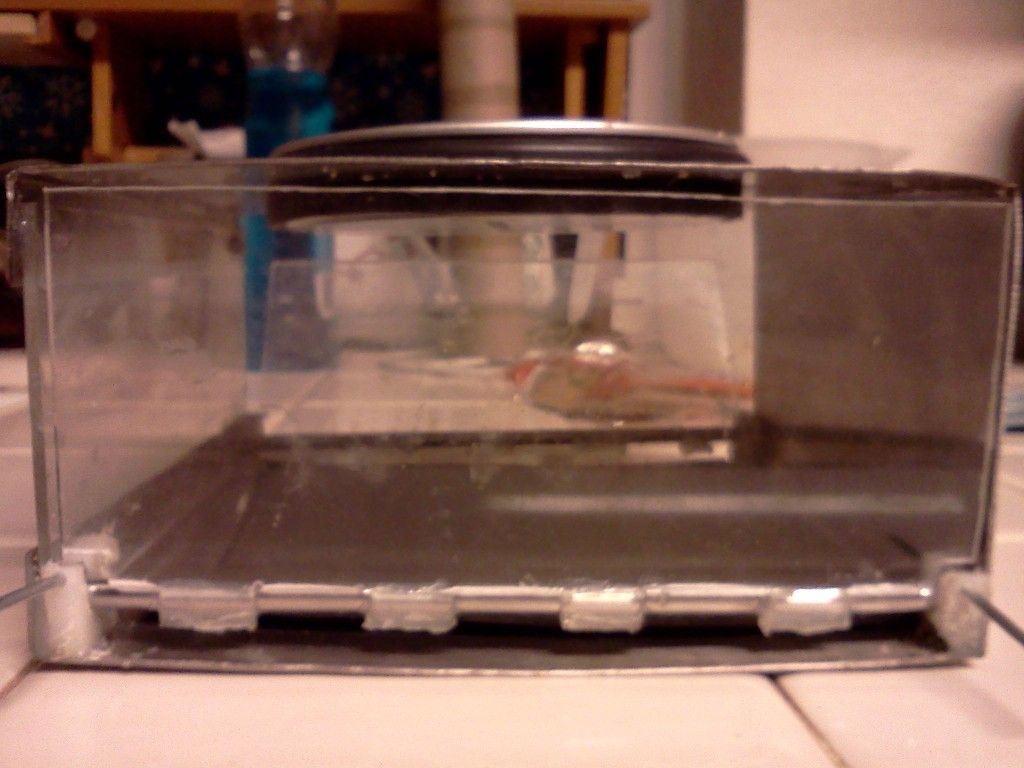
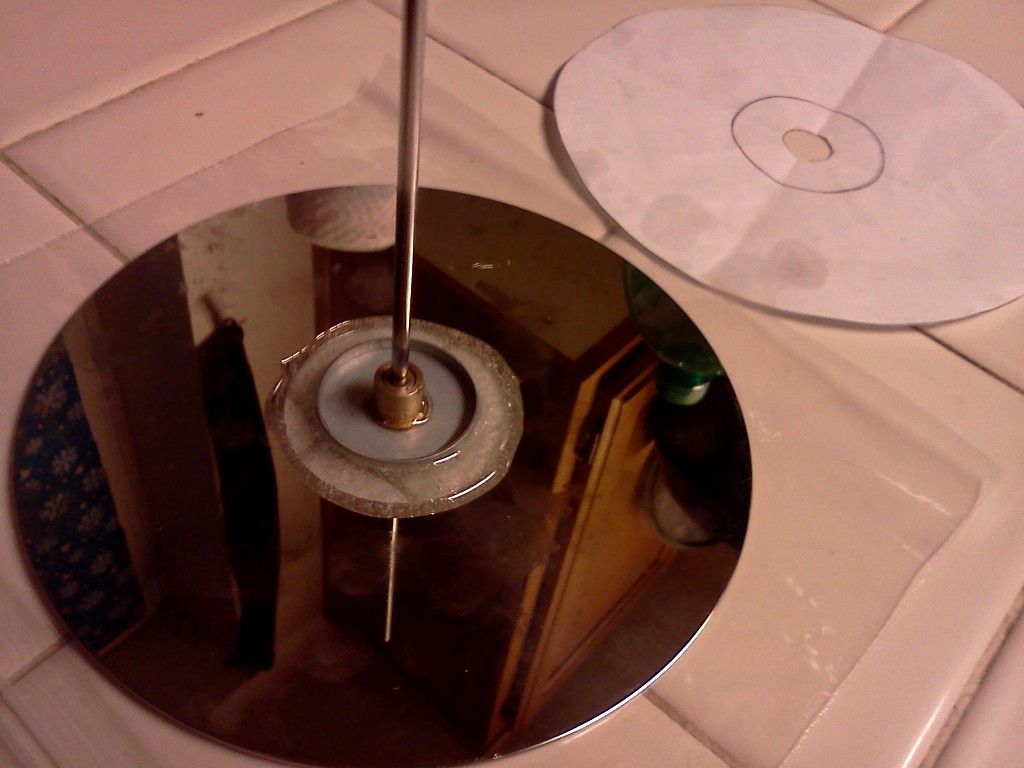
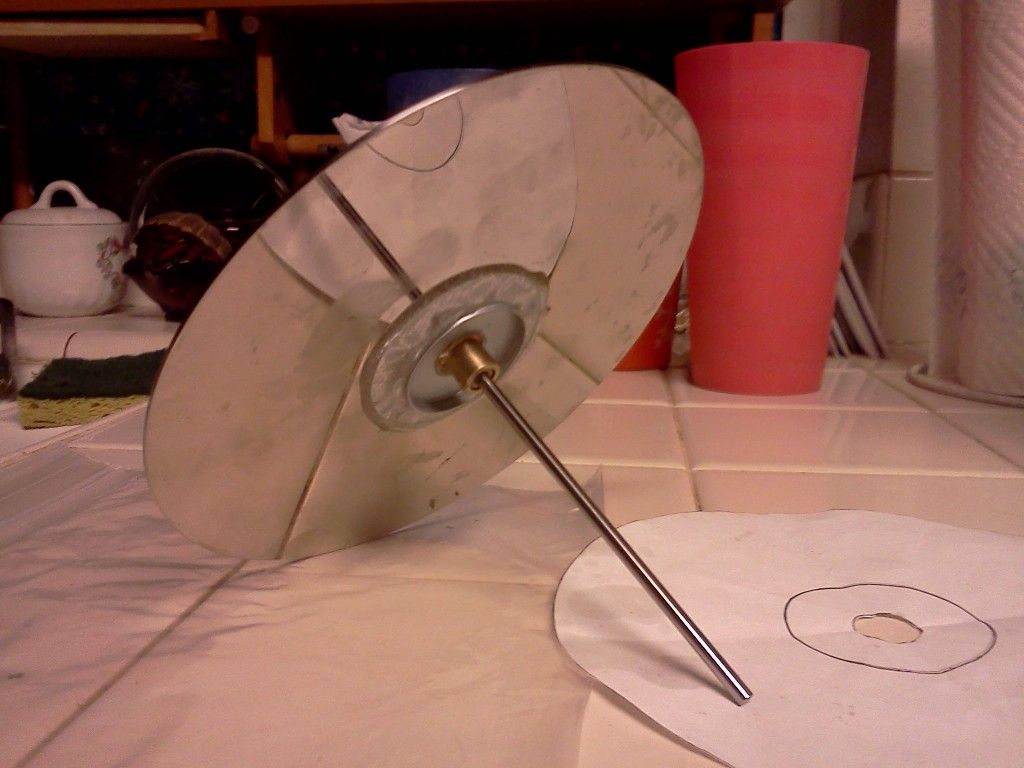
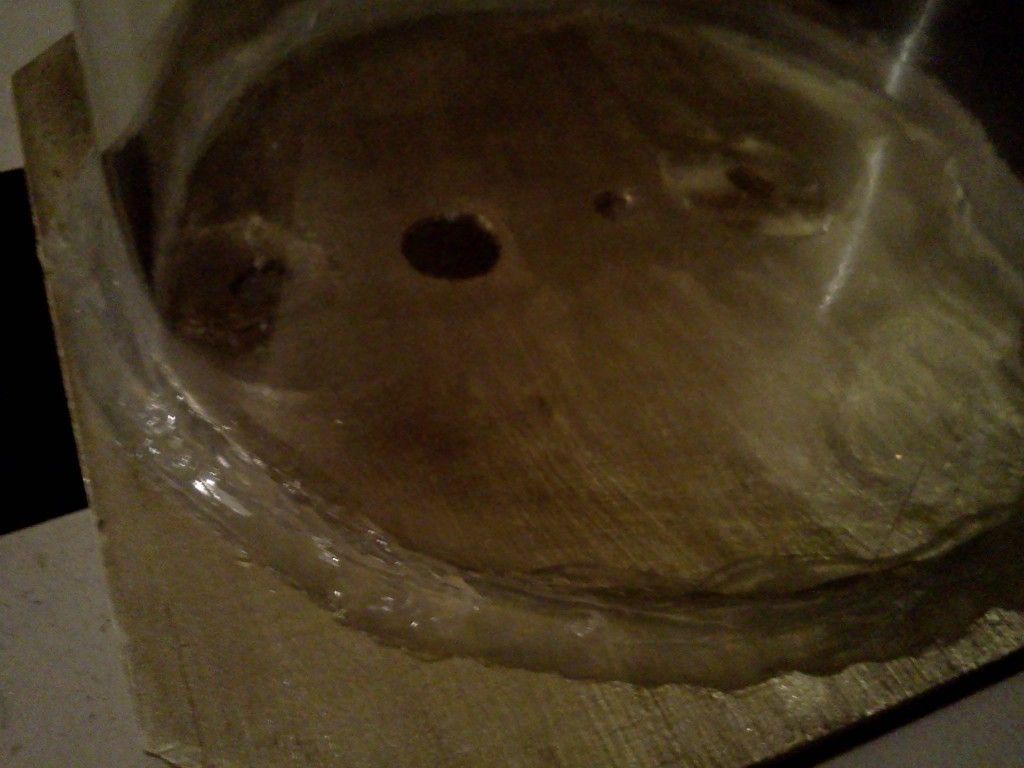
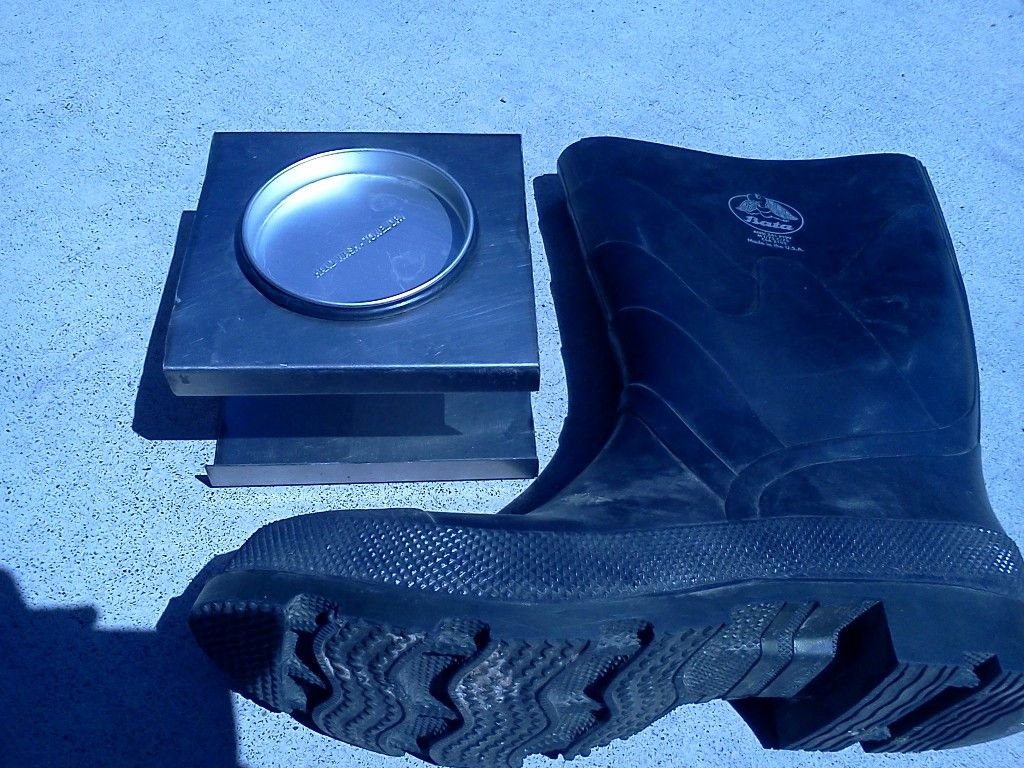
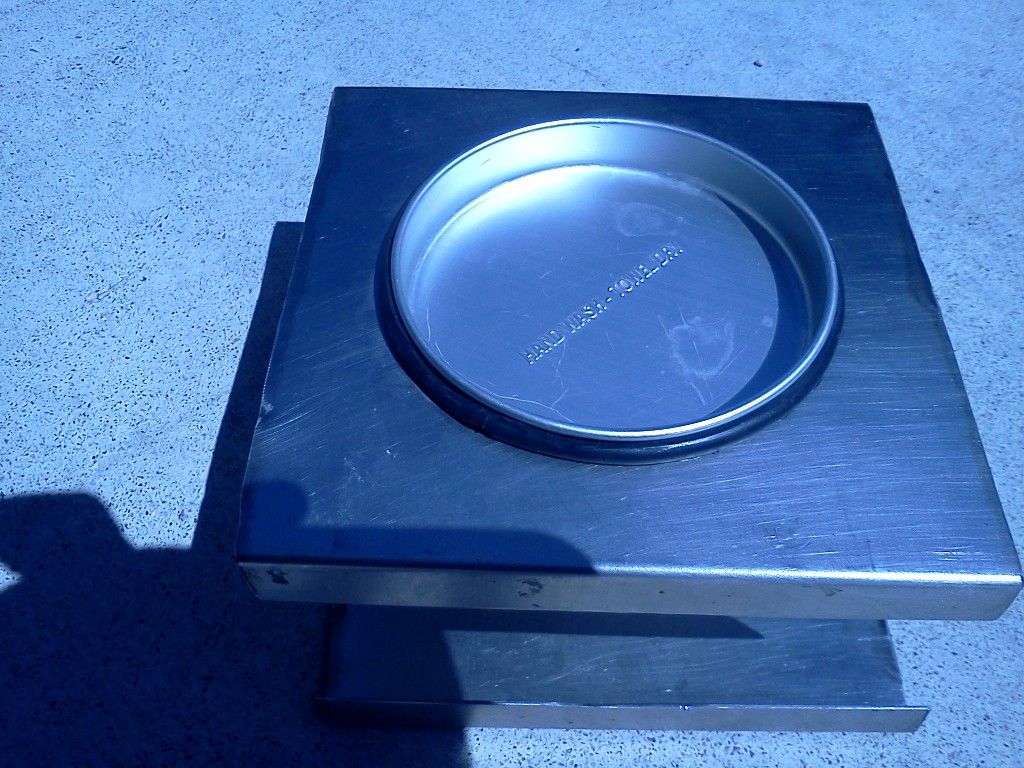
Had an old pair of rubber work boots in the garage I haven't used in years, cut the top of one off to make a gasket the same height as the aluminum pan in the hot box, minus it's tiny flange height. Ground out the circle I cut out till the pan and gasket are a tight press fit without deforming the gasket. It fully covers the sides of the aluminum pan below the flange, may trim it to expose more of the pan if necessary for better heat transfer. I used scissors to cut the rubber boot, which left a couple of small miscuts in the rubber, may redo it with a razor and straight edge, but I'm very happy with the results so far.
Image
Image

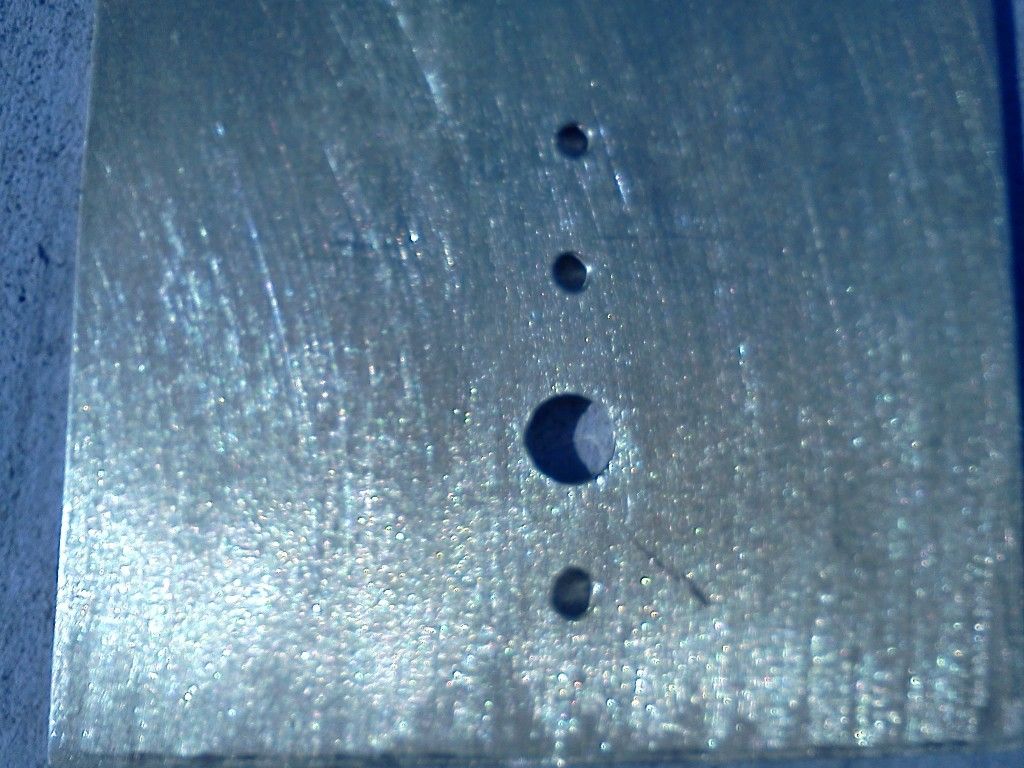
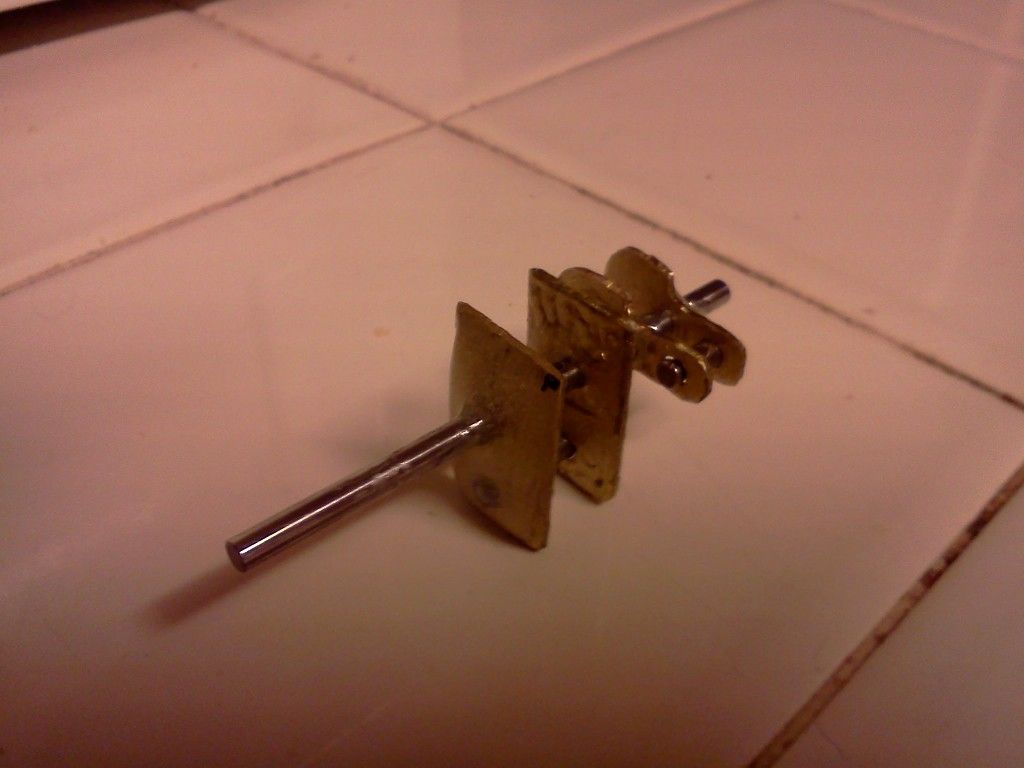
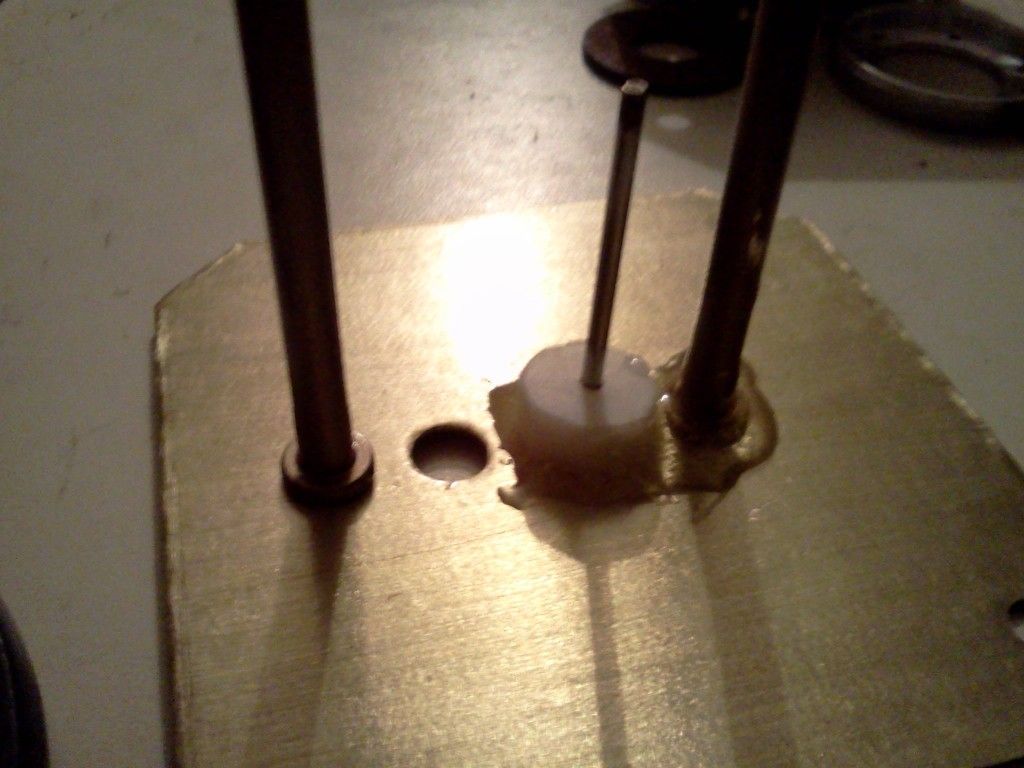
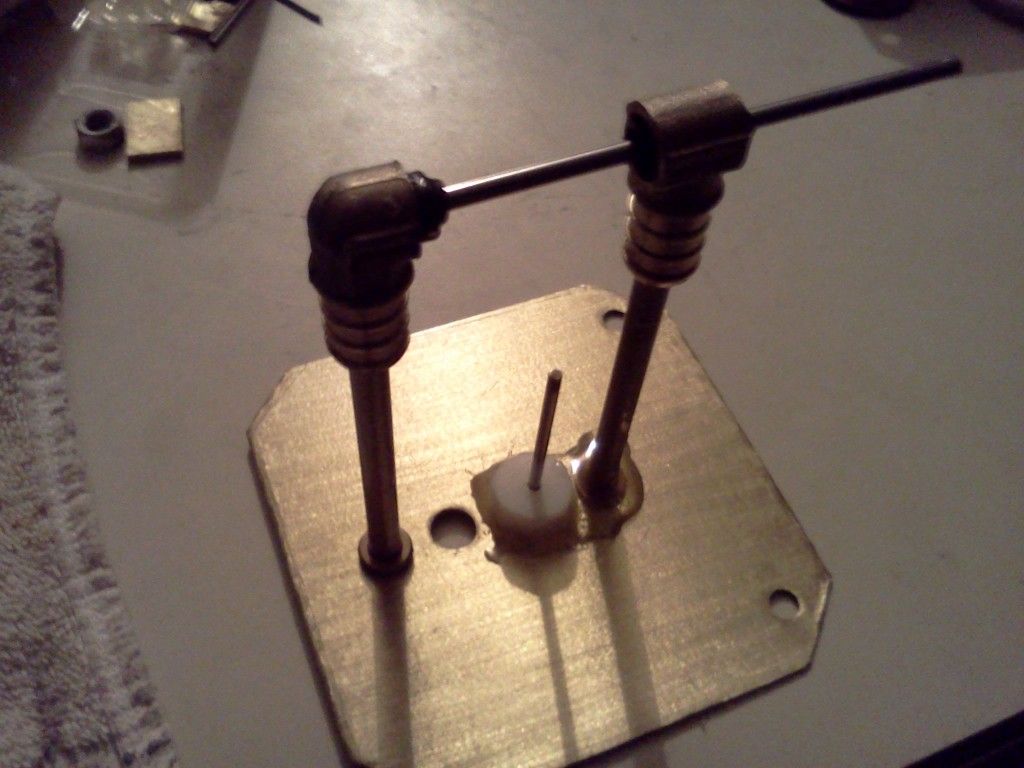
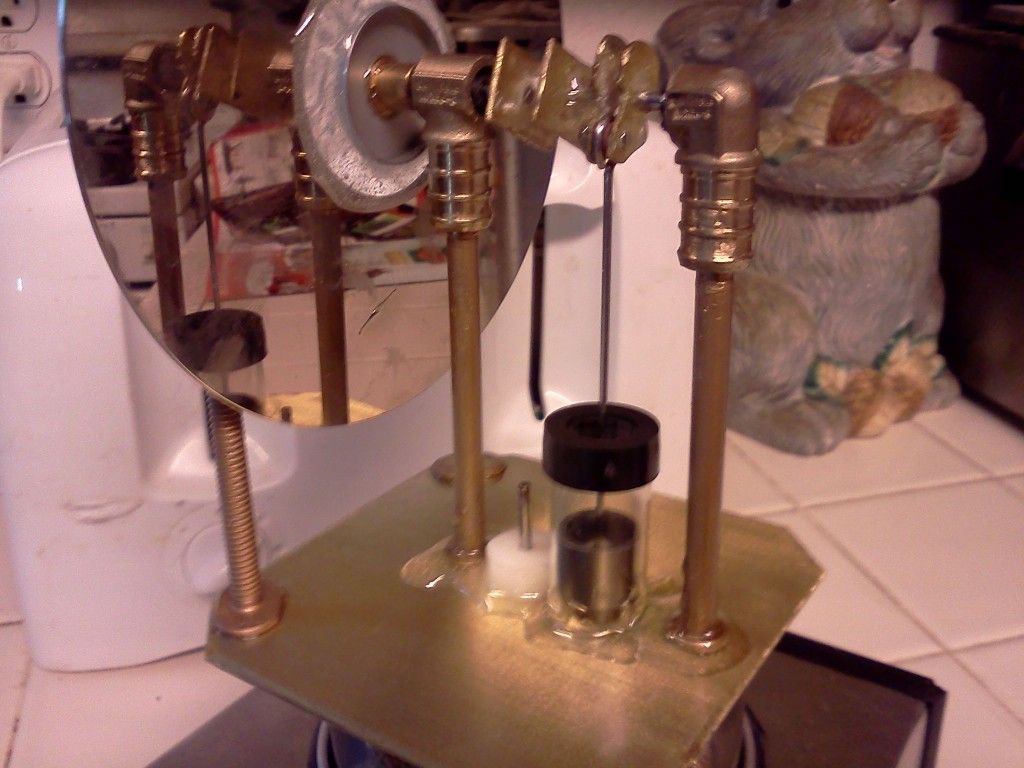
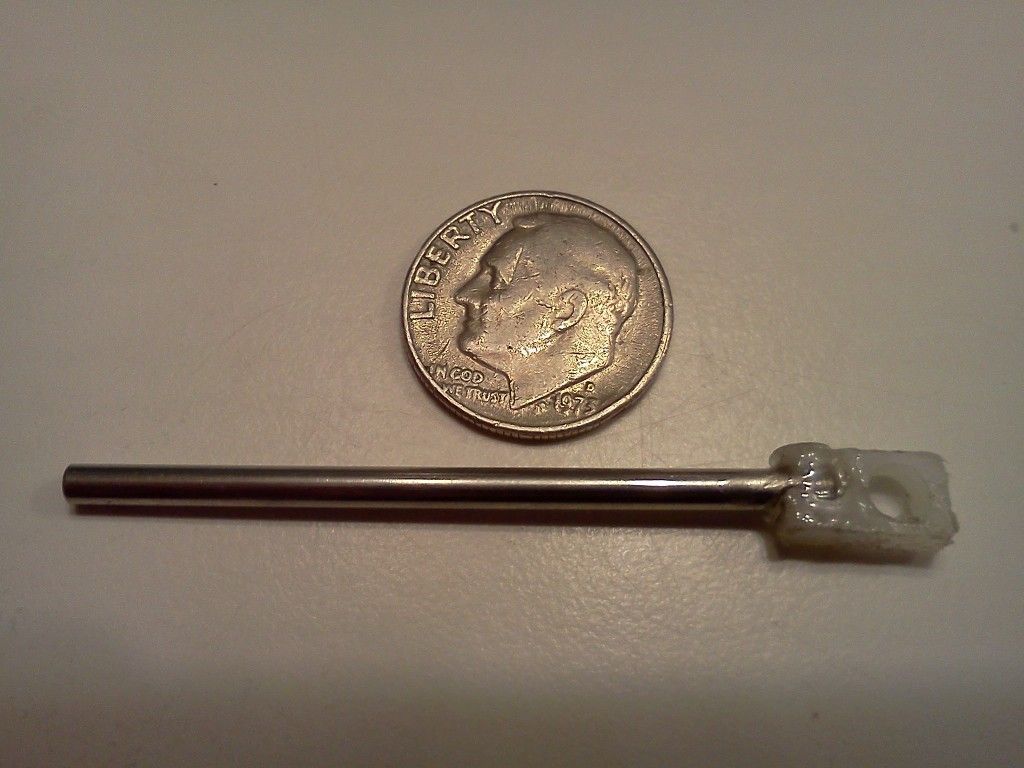
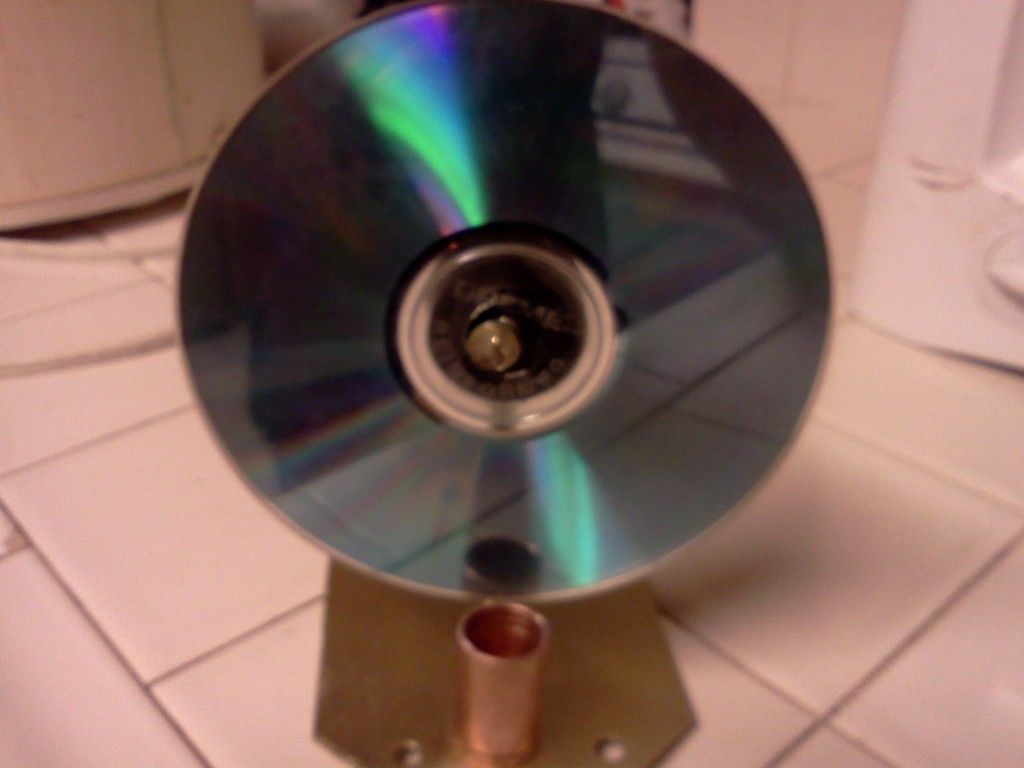
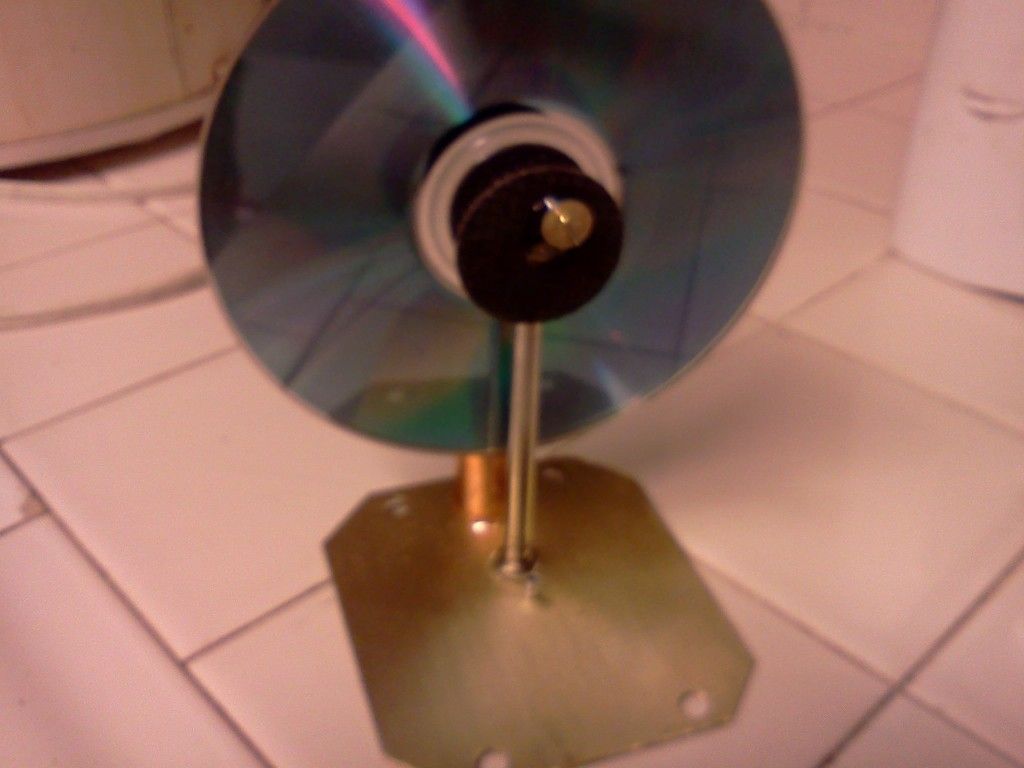
I measured out and drilled the holes for the crankstands, displacer shaft, and power cylinder. I made the rear crankstand hole larger than necessary to allow some positioning before tightening down. I've discovered the rear crankstand was sucked into the bearing housing more than the front one during curing by a bit over 1/16". Will have to use a washer or o-ring to increase it's height a smidge, dang quick set epoxy. Was going to assemble the crankshaft and do the first rough assembly today, but I need to get some brass laquer. I only have wood laquer around the house, and brass laquer will prevent tarnishing longer, especially important on my stoned finish. I first did the stone finish a couple of weeks ago, and it's already showing tarnish, so good laquer is a must.
Image
If I seem argumentative, I apologize. I like to explore many sides of an issue.
I love to be shown I'm wrong, after all, Dad always said to learn from my mistakes!
Jerry
Posts: 79
Joined: Sun Jul 29, 2012 10:42 pm
Location: Las Vegas

Re: LTD Power by Bagel

Post by Jerry »

Spent a couple of hours tonite taking the leftover parts from this project and making a slightly smaller version of it. I'll have the main one running of a fresh hot bagel, and this smaller one running off a cup of coffee. Used the leftover brass plate, one of the original crankstands I made with the toothbrush motor bearings/bushings, the first successfully cut bottle which was too small for the bagel engine, and the stainless steel disc I cut out of the hotbox. Going to make this a single crankstand model, with the displacer on one side of the crankstand, and power piston and flywheel on the other side. Probably will use a hardrive platter for the flywheel. Lots of cleaning up to do on the brass, probably will stone it like the bagel engine, I'm becoming partial to that look.
Image
Image
If I seem argumentative, I apologize. I like to explore many sides of an issue.
I love to be shown I'm wrong, after all, Dad always said to learn from my mistakes!
Ian S C
Posts: 2218
Joined: Thu Dec 02, 2010 5:15 am
Location: New Zealand

Re: LTD Power by Bagel

Post by Ian S C »

Jerry, it might be worth trying,(if theres anyone applicable in your house hold), hair spray, its laquer, I'v got one or two cans(almost empty) in the workshop. Ian S C
Jerry
Posts: 79
Joined: Sun Jul 29, 2012 10:42 pm
Location: Las Vegas

Re: LTD Power by Bagel

Post by Jerry »

Thanks Ian, I've got three cans of wood laquer in the garage, and yes there is always a can or two of hairspray around with the two ladies in the household. Only reason I'm not using the wood laquer is that my research indicates there are special tarnish inhibiting chemicals included in brass laquer. Stoning the finish makes it virtually impossible to polish later, so I want to protect the brass as much as possible.
If I seem argumentative, I apologize. I like to explore many sides of an issue.
I love to be shown I'm wrong, after all, Dad always said to learn from my mistakes!
Jerry
Posts: 79
Joined: Sun Jul 29, 2012 10:42 pm
Location: Las Vegas

Re: LTD Power by Bagel

Post by Jerry »

Didn't have time to do much today, restaurant stayed busy till the end, and the little lady is having a sleep over. I attached the front acrylic piece with epoxy resin and pop rivets, still have to trim off the safety excess I left. Brought home an extra kitchen tile from the restaurant and cut it down to size. I also cut a piece of the rubber boot to fit under the tile. Together, they raise an old stale bagel I'm using for sizing to about 2-6mm below the aluminum pan. Fresh out of the oven the bagels are a more puffed up than this old stale one, so they should actually make contact with the pan for good heat transfer, and the tile and rubber will drain a lot less heat than if the bagel were sitting on the stainless steel. I'm going to have to hang the doors from the bottom and install knobs and magnetic stops, since the tile prevents the doors from swinging freely. With some weather stripping for the door to stand against, the hotbox shouldn't have any major air leakage, so it should retain heat fairly well. If necessary, I can have the bakers put the tile in the oven with the first batch of bagels, to act as a pre-heater.
Image
You can see how the gasket I fashioned from the boot goes all the way to the bottom of the aluminum pan. I'll probably trim it up halfway to allow as much heat transfer as possible, while still maintaining a strong seal between the pan and the hot box. Advantage is I can pull the engine off the hotbox and run it off a cup of coffee at a table, should someone ask about it.
Image
If I seem argumentative, I apologize. I like to explore many sides of an issue.
I love to be shown I'm wrong, after all, Dad always said to learn from my mistakes!
Jerry
Posts: 79
Joined: Sun Jul 29, 2012 10:42 pm
Location: Las Vegas

Re: LTD Power by Bagel

Post by Jerry »

Got the doors mostly finished today. Used rods cut from the oil & vinegar caddy I showed before for the doors' hinge pins. Cut bushings out of the UHMW with a snap to fit shape, and retaining pins are the leftover pins from the pop rivets, the groves the pop rivet tool leaves in them allows for a tight fit without glue, good in case I need to dissasemble. The front bushings are sort of Y shaped to fit around the pop rivets for extra stability, while the rear ones are simple U shapes. All bushings are attached to the box, and doors attached to the hinge pins, with epoxy resin.
Image
Front bushings and retaining pins:
Image
Rear bushings and retaining pins:
Image
Assembled (retaining pins aren't cut to size yet in these pictures):
Image

Will be adding some rubber strips inside the box for the doors to lay against, as well as two brushed nickel drawer knobs, and magnetic stops. Once I add trim around all the box openings, it should have a nice clean look.
If I seem argumentative, I apologize. I like to explore many sides of an issue.
I love to be shown I'm wrong, after all, Dad always said to learn from my mistakes!
Ian S C
Posts: 2218
Joined: Thu Dec 02, 2010 5:15 am
Location: New Zealand

Re: LTD Power by Bagel

Post by Ian S C »

Been looking at the last photos, wounder if it would be an idea to put some sheets of foam inside the hot box to slow the heat loss to the metal sides. Ian S C
Jerry
Posts: 79
Joined: Sun Jul 29, 2012 10:42 pm
Location: Las Vegas

Re: LTD Power by Bagel

Post by Jerry »

Right on track Ian, I planned on insulating from the begining. Rather than foam, I went with more of the rubber boot and black rtv to fill in the gaps. I also added stripping to all edges (first pic shows before cutting corners and filling gap with rtv), and cut the doors to a close fit, close enough to not need magnetic stops after all.
Image
Image
The rubber strips with the pattern I put on the bottom of the doors covering the ugly hinges also act as replacements for handles, just press down on the rubber strip and the doors swing open.
Image
Image
Lots of cleanup to do, got epoxy and rtv smudges everywhere, but it's finally looking like the hotbox I had in mind!
If I seem argumentative, I apologize. I like to explore many sides of an issue.
I love to be shown I'm wrong, after all, Dad always said to learn from my mistakes!
Jerry
Posts: 79
Joined: Sun Jul 29, 2012 10:42 pm
Location: Las Vegas

Re: LTD Power by Bagel

Post by Jerry »

Finally assembled the crankshaft tonite. Had a bit of a setback, apparently when I was cleaning up the other day, I threw out the double thick crank webs I had made per Ian's suggestion. I still have the old crank webs, and frustration prevents me from making another set at the moment, so I went ahead and used the old ones with enough epoxy to double the thickness around the shaft. Here's a quick pic before grinding out the main shaft. The power piston offset shaft is just in there for positioning, it's not epoxied in place yet since I don't want the airpot hooked up till I'm ready to epoxy it to the top plate.
Image
As always, a bit of cleanup to do, but it looks good spinning in the crankstands!
If I seem argumentative, I apologize. I like to explore many sides of an issue.
I love to be shown I'm wrong, after all, Dad always said to learn from my mistakes!
Jerry
Posts: 79
Joined: Sun Jul 29, 2012 10:42 pm
Location: Las Vegas

Re: LTD Power by Bagel

Post by Jerry »

Got started on the flywheel today. Using a harddrive platter, with a bushing from one of the computer fans and it's motor shroud. I traced the platter and bushing on a piece of paper, using folds to find and ensure proper centering. I placed the paper cutout under a plastic sandwich bag (peels off epoxy easily), and put the harddrive platter on top of that. I then filled the center with epoxy resin, and used the paper guide underneath it all to center the brass bushing from the computer fan, with a small bowl on top to keep it weighed down for perpendicular trueness. Once the epoxy set, I added more epoxy, and placed the shroud from the computer fan over the bushing, so that almost all of the center area is metal at some point, with only about a 3-4mm ring of epoxy only. This will be the core of the flywheel, with the bagel shape being attached on the front, and the magnets for power generation attached on the rear.
Image
Image

I also mounted the main crankstand and displacer gland. I used the longer piece of crankshaft material to set it up true. I placed the screw in the rear crankstand, but didn't tighten it down. I then placed a generous glob of resin over the main crankstand's hole, and attached it to the top plate, pulling the resin up the sides with a plastic stick. The resin was begining to run over to the area of the displacer gland, so I quickly applied resin to it's outer rim and set it in position. As the resin began to set, I checked the crankshaft for free and true spin, and it was good, so I added more resin to the sides of the crankstand letting it run down, opposite the first layer which I had pulled up. Checked the crankshaft for true and free spinning again, and every minute or so during the main curing time, and it is good to go.
Image
Image

I also beefed up the crankshaft with extra epoxy, I'm letting all these epoxied parts set up overnite. Tomorrow I will tighten up and epoxy the rear crankstand, with the actual crankshaft and power cylinder in place.
If I seem argumentative, I apologize. I like to explore many sides of an issue.
I love to be shown I'm wrong, after all, Dad always said to learn from my mistakes!
Jerry
Posts: 79
Joined: Sun Jul 29, 2012 10:42 pm
Location: Las Vegas

Re: LTD Power by Bagel

Post by Jerry »

Finished with the basic assembly today. Still have to attach the sign to the sign posts in front of the flywheel, the bagel image to the flywheel (not enough room for a torus shape, have to settle for a picture), and the displacer con-rods.
Image
Image
I went overboard with the epoxy, but I like it's combination of strength and flexibility, so I'm counting on it for a lot of support. I will be using clear RTV for the displacer tube, much easier to remove if necessary. Still have to add the magnets to the flywheel, a coil to the front crankstand, and the "Fresh Hot" leds, but I want to see if I can get it running first.
If I seem argumentative, I apologize. I like to explore many sides of an issue.
I love to be shown I'm wrong, after all, Dad always said to learn from my mistakes!
Jerry
Posts: 79
Joined: Sun Jul 29, 2012 10:42 pm
Location: Las Vegas

Re: LTD Power by Bagel

Post by Jerry »

Got the displacer con-rod and it's bearing made this morning. I drilled a hole to fit the crankshaft in a piece of UHMW, then cut a square out around it. I used the dremel diamond disc to cut a wedge into one side of the square to allow it to snap onto the crankshaft. I then cut a groove around the square for the con-rod to sit in when wrapping it around the bearing. This allows the UHMW bearing to be snapped onto the crankshaft, and then the con-rod snaps on around the bearing, with a slight squeeze to tighten it up. Used a bicycle spoke for the con-rod.
Image
Image
I got the sign finished on the front, gotta do the graphics tonite/tomorrow. I also attached the displacer cylinder to the top plate with clear RTV. Needed it set in place before attaching the displacer to it's shaft/con-rod to ensure everything is centered properly. Tonite I'll work on attaching the displacer to it's shaft, and making a connector for the shaft to con-rod out of either epoxy or UHMW.
If I seem argumentative, I apologize. I like to explore many sides of an issue.
I love to be shown I'm wrong, after all, Dad always said to learn from my mistakes!
Jerry
Posts: 79
Joined: Sun Jul 29, 2012 10:42 pm
Location: Las Vegas

Re: LTD Power by Bagel

Post by Jerry »

Made the smallest part today, the connector for the displacer shaft to con-rod. Used some more of the UHMW, and epoxied it to the displacer shaft. The hole is large enough to thread the bicycle spoke con-rod, and use it's hub end as the retaining flange.
Image

I added a second layer of clear RTV to the top plate displacer seam, should have a good seal now.
Image
Once it sets overnite, I can mark the displacer shaft connection point, attach it, and give it a whirl. A little balancing, a tweak here or there, and I'll finally be ready to test her out.
If I seem argumentative, I apologize. I like to explore many sides of an issue.
I love to be shown I'm wrong, after all, Dad always said to learn from my mistakes!
Jerry
Posts: 79
Joined: Sun Jul 29, 2012 10:42 pm
Location: Las Vegas

Re: LTD Power by Bagel

Post by Jerry »

I attached the displacer and it's linkage, everything's looking good so far. Without having balanced the flywheel, a gentle spin gives 4-6 revolutions, and a harder one 12 or more. No apparent binding or rough spots, just nice smooth motion. Ready to seal the bottom and give her a test over the weekend, wish me luck!
(click on the picture below to see the video)
Image
If I seem argumentative, I apologize. I like to explore many sides of an issue.
I love to be shown I'm wrong, after all, Dad always said to learn from my mistakes!
Jerry
Posts: 79
Joined: Sun Jul 29, 2012 10:42 pm
Location: Las Vegas

Re: LTD Power by Bagel

Post by Jerry »

I added the counterweight to the flywheel and got everything balanced nicely now. Spins rarely stop in the same area twice in a row, and there's no settling into any particular position. I used an old laptop harddrive spindle cover and epoxied it on in position. I then added 7 coats of epoxy to it, building it up like a button shape and slowly spinning the flywheel as each coat set, till I had enough weight to balance the system. Looks like I can seal up the base tomorrow, trying to decide between gasket and clear RTV.
(click the picture below for video of balanced spins)
Image

I am still working on the smaller engine built from the scraps from this project. I used the worn dremel cut-off discs and some thumb tacks to finish the 2-cd flywheel and cranks. Using the toothbrush motor parts, I used the brass end bushings to ensure the discs were perpendicular, used the teflon spacers to keep everything in position, then epoxied things in place.
Image
I epoxied a plumbing coupling to use for the power cylinder, and a pop-rivet for the displacer gland and shaft.
Image
Image
I'll epoxy the displacer to it's shaft, and use clear RTV to attach the displacer tube to top and bottom plates tomorrow.
If I seem argumentative, I apologize. I like to explore many sides of an issue.
I love to be shown I'm wrong, after all, Dad always said to learn from my mistakes!
Post Reply